1.Vue是怎么识别 v- 指令的?
首先将HTML结构解析成属性列表,存入到数组中,接着遍历数组中的每一个节点,获取到不同指令对应的方法。
// 将HTML看作真正的属性列表
var ndoeAttrs = node.attributes;
var self = this;
// 类数组对象变为数组,一层一层的遍历节点
[].slice.call(nodeAttes).forEach(attr => {
	// 这里开始分析指令
	var attrName = attr.name;
	var value = attr.value;
	// 指令都是 v- 开头的
	var dir = attrName.substring(2);
	if(attrName.indexOf('v-') == 0){
		// v-下不同的指令
		if(dir == 'model'){
			// console.log('发现了model指令',value);
			// 添加Watcher
			new Watcher(self.$vue, value, value => {
				node.value = value;
			});
			// 得到 v 的值
			var v = self.getVueVal(self.$vue, value);
			// 显示 v 的值
			node.value = v;
			// 添加监听事件,基本实现双向绑定
			node.addEventListener('input', e => {
				var newVal = e.target.value;
				self.setVueVal(self.$vue, value, newVal);
				v = newVal;
			});
		}else if(dir == 'if'){
			// console.log('发现了if指令',value);
		}
	}
})
2
3
4
5
6
7
8
9
10
11
12
13
14
15
16
17
18
19
20
21
22
23
24
25
26
27
28
29
30
31
32
33
2.v-model底层是怎么实现的?
v-model会把关联的相应式数据(info.message),动态的绑定到表单元素的value属性上,然后监听input事件;当
v-model绑定的相应数据发生变化时,表单元素的value值也会随之变化。
<template>
  <div>
    <div class="message">{{ info.message }}</div>
    <div><input v-model="info.message" type="text"></div>
    <button @click="change">click</button>
  </div>
</template>

<script>
  export default {
    data () {
      return {
        info: {}
      }
    },
    methods: {
      change () {
        this.info.message = 'hello world'
      }
    }
  }
</script>
2
3
4
5
6
7
8
9
10
11
12
13
14
15
16
17
18
19
20
21
22
面试题:v-for 和 v-if为什么不能一起用?
涉及到一个优先级的问题,v-for 比 v-if优先执行,如果一起使用,循环出来的每一项都会去判断一下v-if是否为true或者false,这样就会照成资源的浪费!
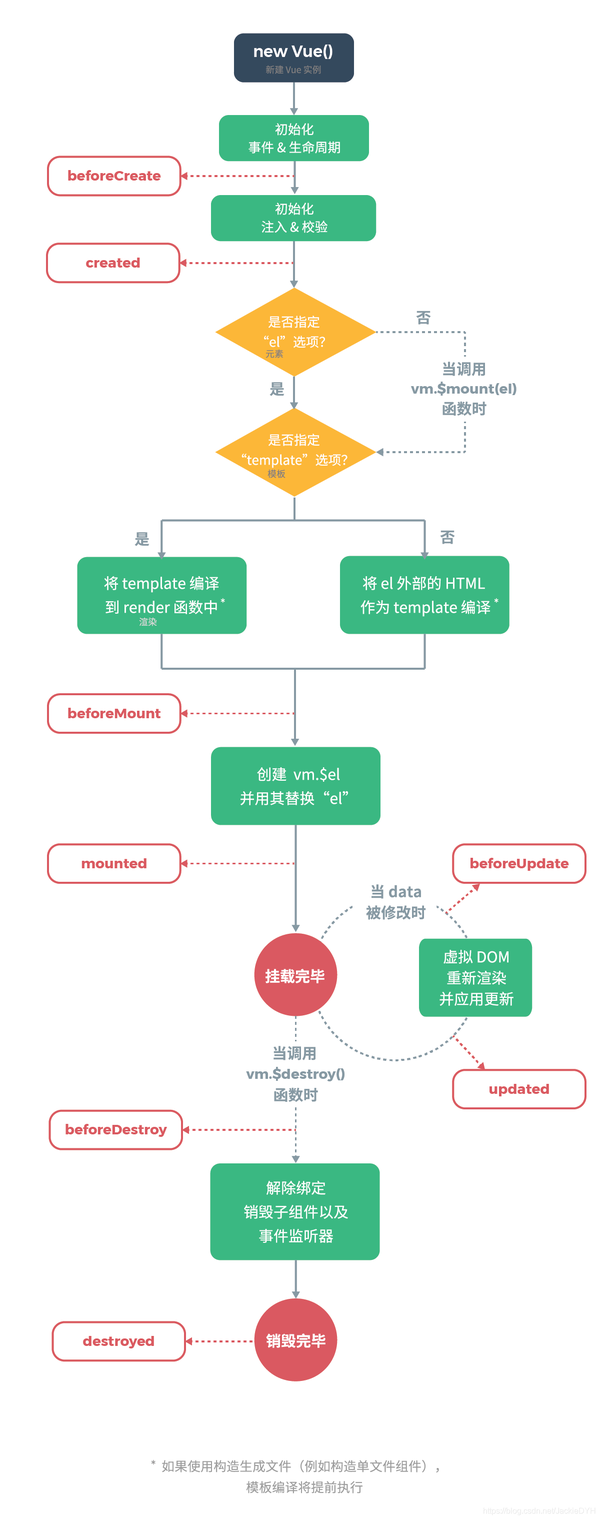
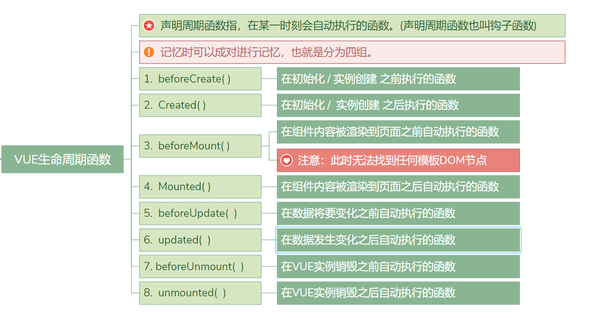
3.生命周期


beforeCreate & created
属于实例化阶段,在
_init方法内,DOM 被挂载时执行,两个函数都不能获取到 prop、data 中定义的值,也不能调用methods中定义的函数。
Vue.prototype._init = function (options?: Object) {
  // ...
  initLifecycle(vm)
  initEvents(vm)
  initRender(vm)
  callHook(vm, 'beforeCreate')
  initInjections(vm) // 在prop、data 之前解决注入
  initState(vm)
  initProvide(vm) // 解决初始化之后的prop、data
  callHook(vm, 'created')
  // ...
}
2
3
4
5
6
7
8
9
10
11
12
beforeMount &mounted
属于挂载阶段,在
mountComponent方法内,响应数据被修改时执行,对于同步渲染的子组件而言,mounted钩子函数的执行顺序是先子后父。
export function mountComponent (
  vm: Component,
  el: ?Element,
  hydrating?: boolean
): Component {
  vm.$el = el
  callHook(vm, 'beforeMount')

  let updateComponent

  if (process.env.NODE_ENV !== 'production' && config.performance && mark) {
    updateComponent = () => {
      const name = vm._name
      const id = vm._uid
      const startTag = `vue-perf-start:${id}`
      const endTag = `vue-perf-end:${id}`

      mark(startTag)
      const vnode = vm._render()
      mark(endTag)
      measure(`vue ${name} render`, startTag, endTag)

      mark(startTag)
      // 执行vm._update 把 VNode 渲染到 真实 DOM
      vm._update(vnode, hydrating)
      mark(endTag)
      measure(`vue ${name} patch`, startTag, endTag)
    }
  } else {
    updateComponent = () => {
      vm._update(vm._render(), hydrating)
    }
  }
  // 把它设为vm._watcher 在watcher的构造函数中.
  // 因为观察者的初始补丁可能会调用$forceUpdate(例如:inside child . exe)
  // 组件的挂载钩子),依赖于vm._watcher已经定义.
  new Watcher(vm, updateComponent, noop, {
    before () {
      if (vm._isMounted) {
        callHook(vm, 'beforeUpdate')
      }
    }
  }, true /* isRenderWatcher */)
  hydrating = false
  // 手动挂载实例,调用挂载在self上
  // 挂载在其插入的钩子中为渲染创建的子组件调用
  if (vm.$vnode == null) {
    vm._isMounted = true
    callHook(vm, 'mounted')
  }
2
3
4
5
6
7
8
9
10
11
12
13
14
15
16
17
18
19
20
21
22
23
24
25
26
27
28
29
30
31
32
33
34
35
36
37
38
39
40
41
42
43
44
45
46
47
48
49
50
beforeUpdate & updated
属于更新阶段,在渲染
Watcher的 before 函数内,元素被销毁之前执行,在callUpdatedHooks函数中,等vm._watcher的回调执行完毕后,才能执行update函数。
export function mountComponent (
  vm: Component,
  el: ?Element,
  hydrating?: boolean
): Component {
  // ...

  // 把它设为vm._watcher 在watcher的构造函数中.
  // 因为观察者的初始补丁可能会调用$forceUpdate(例如:inside child . exe)
  // 组件的挂载钩子),依赖于vm。_watcher已经定义.
  new Watcher(vm, updateComponent, noop, {
    before () {
      if (vm._isMounted) {
        callHook(vm, 'beforeUpdate')
      }
    }
  }, true /* isRenderWatcher */)
  // ...
}
2
3
4
5
6
7
8
9
10
11
12
13
14
15
16
17
18
19
20
beforeDestory & destroyed (3.x中更名为 beforeUnmount & unmounted)
属于销毁阶段,在
$destroy函数前执行,从parent的$children中删掉自身,删除watcher。
Vue.prototype.$destroy = function () {
    const vm: Component = this
    if (vm._isBeingDestroyed) {
      return
    }
    callHook(vm, 'beforeDestroy')
    vm._isBeingDestroyed = true
    // 将self从父节点移除
    const parent = vm.$parent
    if (parent && !parent._isBeingDestroyed && !vm.$options.abstract) {
      remove(parent.$children, vm)
    }
    // 卸载 watchers
    if (vm._watcher) {
      vm._watcher.teardown()
    }
    let i = vm._watchers.length
    while (i--) {
      vm._watchers[i].teardown()
    }
    // 从数据ob中移除引用
    // frozen object 没有观察者。
    if (vm._data.__ob__) {
      vm._data.__ob__.vmCount--
    }
    // 调用最后一个钩子
    vm._isDestroyed = true
    // 在当前redered 树上调用销毁钩子
    vm.__patch__(vm._vnode, null)
    // 销毁钩子函数
    callHook(vm, 'destroyed')
    // 关闭所有实例侦听器。
    vm.$off()
    // 删除vue reference
    if (vm.$el) {
      vm.$el.__vue__ = null
    }
    // 发布循环引用
    if (vm.$vnode) {
      vm.$vnode.parent = null
    }
  }
2
3
4
5
6
7
8
9
10
11
12
13
14
15
16
17
18
19
20
21
22
23
24
25
26
27
28
29
30
31
32
33
34
35
36
37
38
39
40
41
42
renderTracked & renderTriggered(3.x新增)
都是跟踪虚拟DOM 重新渲染时调用,接收
debugger event参数;renderTracked() : 此事件告诉你哪个操作跟踪了
组件,以及该操作的目标对象和键。renderTriggered() : 此事件告诉你哪个操作触发了
重新渲染,以及该操作的目标对象和键。
<div id="app">
  <button v-on:click="addToCart">Add to cart</button>
  <p>Cart({{ cart }})</p>
</div>
2
3
4
const app = Vue.vreateApp({
    data(){
        return{
			cart: 0
        }
    },
    // cart 操作*跟踪*了 组件
    renderTracked({ key, target, type }){
        console.log({ key, target, type })
        /*{ key: "cart", target:{cart: 0}, type: "get" }*/
    },
    // cart 操作*触发*了 重新渲染
    renderTriggered({ key, target, type }) {
  		console.log({ key, target, type })
  	},
    methods: {
        addToCart(){
            this.cart += 1
            /*{ key: "cart", target:{cart:1}, type: "set" }*/
        }
    }
})
app.mount('#app')
2
3
4
5
6
7
8
9
10
11
12
13
14
15
16
17
18
19
20
21
22
23
总结: Vue生命周期函数就是在初始化,及数据更新过程各个阶段执行不同的钩子函数;在created钩子函数中可以访问到数据,在mounted钩子函数中可以访问到DOM,在destroyed 钩子函数中可以做一些定时器销毁工作!
参考:v-model源码解析
s
